To get cherry trees into production quickly and produce large firm cherries, it is generally accepted that we must:
• Grow each tree close to its natural form.
• Allow good penetration of sunlight through the entire canopy.
• Prune minimally. The less pruning you do, the higher the yields of early crops.
• Control vegetative vigor and promote good development of branches.
The Aussie (Australian) Bush incorporates these fundamental tenets. The architecture of the Aussie Bush is simple, containing a hierarchic structure with mostly fruiting wood and little structural wood.
Manage trees on strong rootstocks (as described below) to allow early cropping. However, do not use these methods on cherry trees on dwarfing rootstocks, which may not be vigorous enough to produce large cherries every year.
The recommended row spacing is 4.50 meters (14.7 feet) with 2.5 meters (about 8 feet) between trees (889 trees per hectare or 360 trees per acre). Rows run north to south.
Manage the trees as follows:
Year 1
Build the permanent tree structure (vegetative part).
• Head the trees after planting.
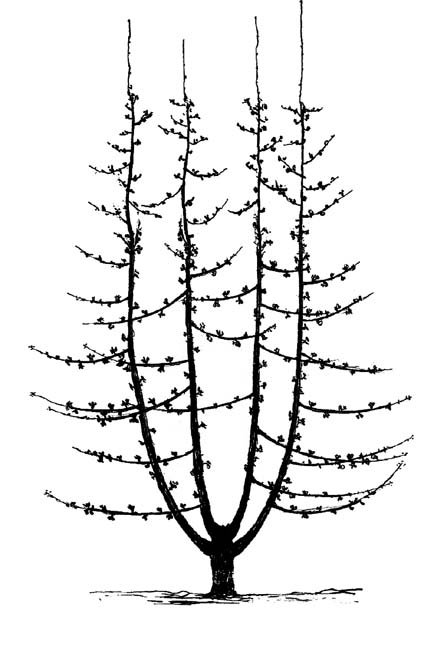
• With each tree, select four shoots of equal size and allow these to grow straight up. Tree vigor is divided over four future leaders.
• Remove any sylleptic shoots in summer.
In their first year, trees are commonly about 2.4 meters (about 8 feet) high. The four leaders form a narrow cylinder in the shape of a champagne glass.
Year 2
Build potential fruiting branches (reproductive part) and minimize tree vigor.
• When buds begin to swell, 1) disbud the inside of the leaders, 2) rub out the buds around and just under the terminal bud of each leader, and 3) paint the buds that face outwards with a Promalin solution (1 part Promalin to 3 parts dark latex paint). These three methods ensure that lateral shoots develop well, starting at the lower half of the leader.
• Remove strong lateral shoots and those with narrow crotch angles.
• Depending on the number of new flat lateral shoots, it may be necesary to spread some shoots with large clothespins to horizontal when the shoot is twice as long as the clothespin. After two or three weeks, move the clothespin to the shoot tip to keep it flat. Control the tip, and you control the shoot.
• Keep as many flat, pencil-thick, lateral shoots as possible, and withhold fertilizer. Use deficit irrigation. These pointers should slow down growth of the leaders. Too much vigor will cause the tips of lateral shoots to turn up.
• When lateral shoots are about 250 millimeters (10 inches) long, start water-stressing the trees to stop extension growth. Terminal buds form when shoots stop growing.
• In late June, head the leaders at 2.80 meters (9 feet).
The key to the Aussie Bush is to manage buds and lateral shoots intensively to induce precocity and slow down vigor.
Year 3
Trees should produce a small crop (about 1 pound per tree). Fruiting branches spur up (become fruitful). Control growth of leaders.
• Maintain good sunlight penetration throughout the tree.
• Notch buds to create more fruiting branches. Paint the notch with a copper solution.
• The diameter of a fruiting branch at its point of origin must be one-third or less the diameter of the leader.
• Stub side shoots on the fruiting branches. Only allow the terminal bud to extend the fruiting branch. The length of this extension growth should be less than last year’s growth. Control this extension growth with deficit irrigation, withhold fertilizer, and (if necessary) allow weeds to compete with the trees for water. The trick is to make trees suffer enough to “push” them from the vegetative phase towards the reproductive phase. Do this as early in the life of the trees as possible by nonpruning methods. Spreading shoots will not increase fruitfulness, until extension growth is stopped, and the shoot sets a terminal bud. Stress through deficit irrigation has no detrimental effect on trees on strong rootstocks, provided the trees are adequately protected from pests and diseases.
• Stub any unwanted parasitic new shoots. Stubbing prevents bacterial canker from moving into the leaders. The larger the diameter of the wood to be cut, the longer the stub must be.
• Start spacing out fruiting branches to open up light windows.
• Prevent the tops of the leaders from out-growing the bottoms by double delay-heading the leaders. First, delay-head last year’s extensions of the leaders to about five inches once growth has started. When the five-inch stub develops several new shoots, cut the stub back further to about one inch. Then singulate the regrowths (chimneys) in late summer. You must control the strong apical dominance of the cherry tree.
• In the fall, depending on the fruiting habit of the variety, some fruiting branches may have to be cut back to maintain a balance in the leaf-to-fruit ratio along the branch. Do this judiciously, because tipping or heading shoots on young trees delay the formation of fruitful spurs.
• Fruiting branches should be about two feet long in the bottom part of the tree, and about one foot long further up the leader. Large cherries grow close to the leaders.
Dominant leaders with subordinate fruiting branches maintain a proper balance of vegetative vigor. This leads to calm growth and precocious trees that generally do not become infected with bacterial canker. If you don’t get this right in the first three years, you will have a long and expensive battle on your hands.
Year 4 and beyond
Strive more for firm, crisp, large and sweet cherries than for quantity. You achieve a yield of 6 to 8 kilograms (13 to 18 pounds) per tree in the fourth year, reaching an optimum yield of 15 to 18 kilograms (33 to 40 pounds) per tree annually. Control growth of leaders.
• In early spring, stub any new lateral shoots, especially in the tops. Keep one weak upright shoot in the top of each leader. Delay-head this shoot next spring. Do not allow the lower portion of the trees to shade out. Sunlight comes from above, so always correct any light problems in the top of the tree. The bottom half of the tree will then look after itself and remain fruitful. You don’t need a sophisticated light meter; the tree will tell you if there is a problem. Just look at how many five-pointer spurs there are.
• Remove weak and pendant wood to increase the leaf-to-fruit ratio on the remaining fruiting branches. High leaf-to-fruit ratio leads to large and firm cherries (80 to 120 square centimeters or 12 to 18 square inches of leaf area per cherry).
• Maintain optimum production of large cherries by branch rotation. Since large cherries are grown on young spurs that are well exposed to sunlight, start branch renewal in the sixth or seventh year. Allow a branch to fruit for four or five years. To encourage new shoots and younger fruiting branches to develop, head back some branches that have fruited to about 5 inches. Grow only one new shoot from the stub, preferably from a bud facing down. Make sure that the stubs are adequately exposed to sunlight, or they will not regenerate.
• Always prune in summer and have “finished” trees in autumn. Finished trees grow in balance with their roots and do not need work done in winter.
You can now focus on growing large, high quality cherries every year.
Bas van den Ende is a fruit production consultant based in Shepparton, Australia.
Leave A Comment